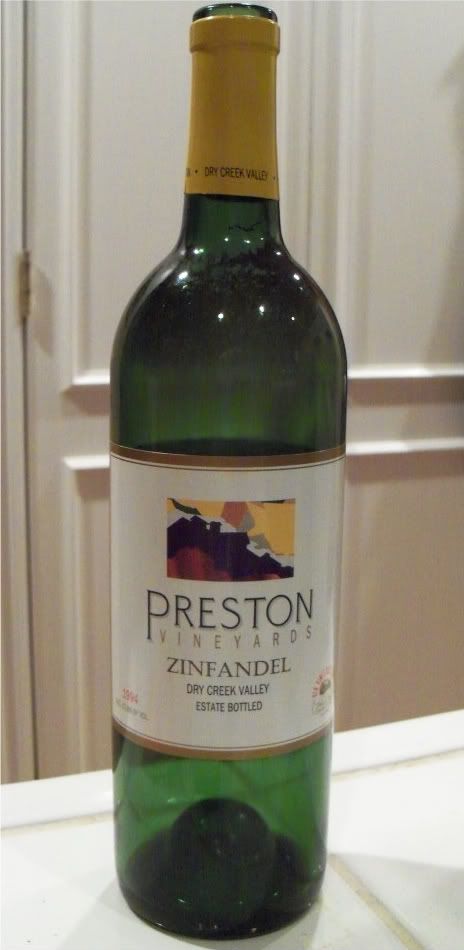
As I have mentioned before, I am not particularly experienced with wine. In fact, until a few nights ago, I had never tasted a Zinfandel. One of the bottles my mom's brother gave us for her birthday was a Preston Vineyards 1994 Dry Creek Zinfandel. It was lovely. The color was a nice dark red. The taste was different from the Cabernet Sauvignons which I usually consume. The taste was more refreshing with a hint of lemon, and, if I remember correctly a slight taste of ginger. It was complex while still being smooth but having a medium body-- sort of like a lightweight velvet. I also believe I remember detecting a hint of vanilla.
We recently got a shipment from Garagiste. Some of the wines were recent mystery wines which I am very excited to try. The only wine we have tried from the set was not a mystery wine, it was a small vineyard's Cabernet Savignon called "The Girls in the Vineyard." This is the only commercial wine made by a grower named Rob McDonald. The rest of his wine is made out of the small vineyard in his front yard and is made mostly for friends. These grapes come from a vineyard in the lake country and the grapes are sustainably farmed. The "girls" are the vines and the name demonstrates the commitment to the grapes. The article from where I got all the information can be found here.
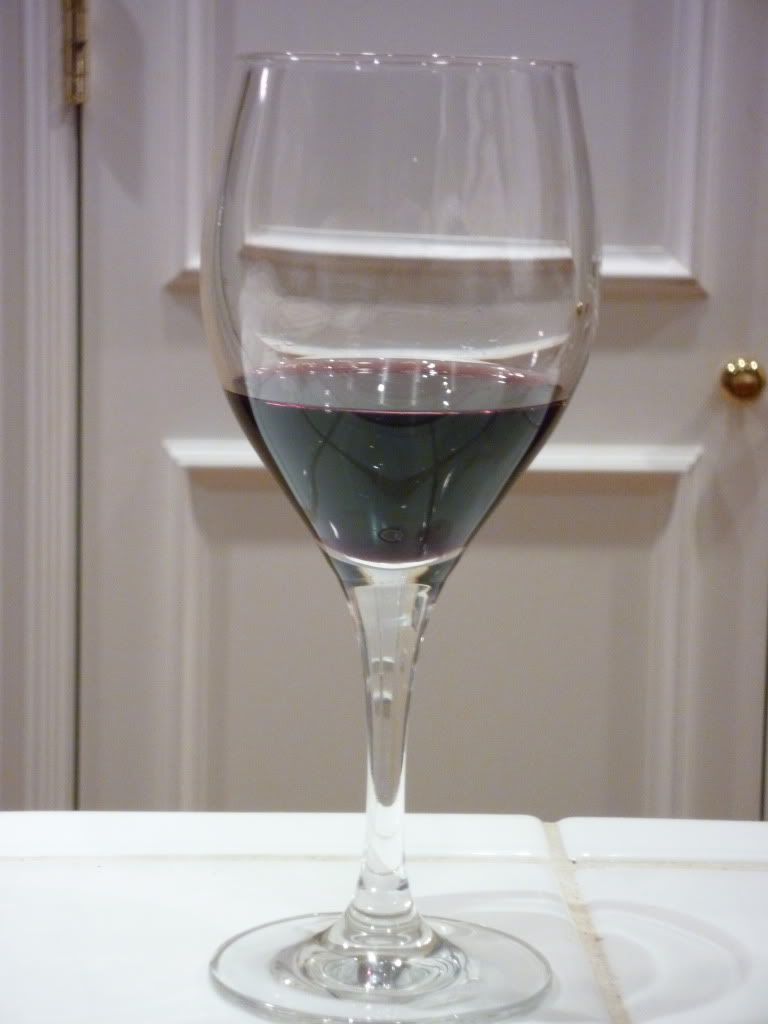
A Glass of Wine
Bottle + Glass
The wine was fabulous. It was a nice, light, Cabernet with a hint of fruitiness and was complex with a spicy and and a crisp and refreshing finish. The wine had an elegant balance to it, perfect by itself or with any food, and without the weight or syropiness of a typical Cabernet. The second day it had a slightly greater array of spices to it making it slightly warm on the tongue. I will updates this with a more detailed description with the next bottle. It has been about a week since I tried it. It can be found here.
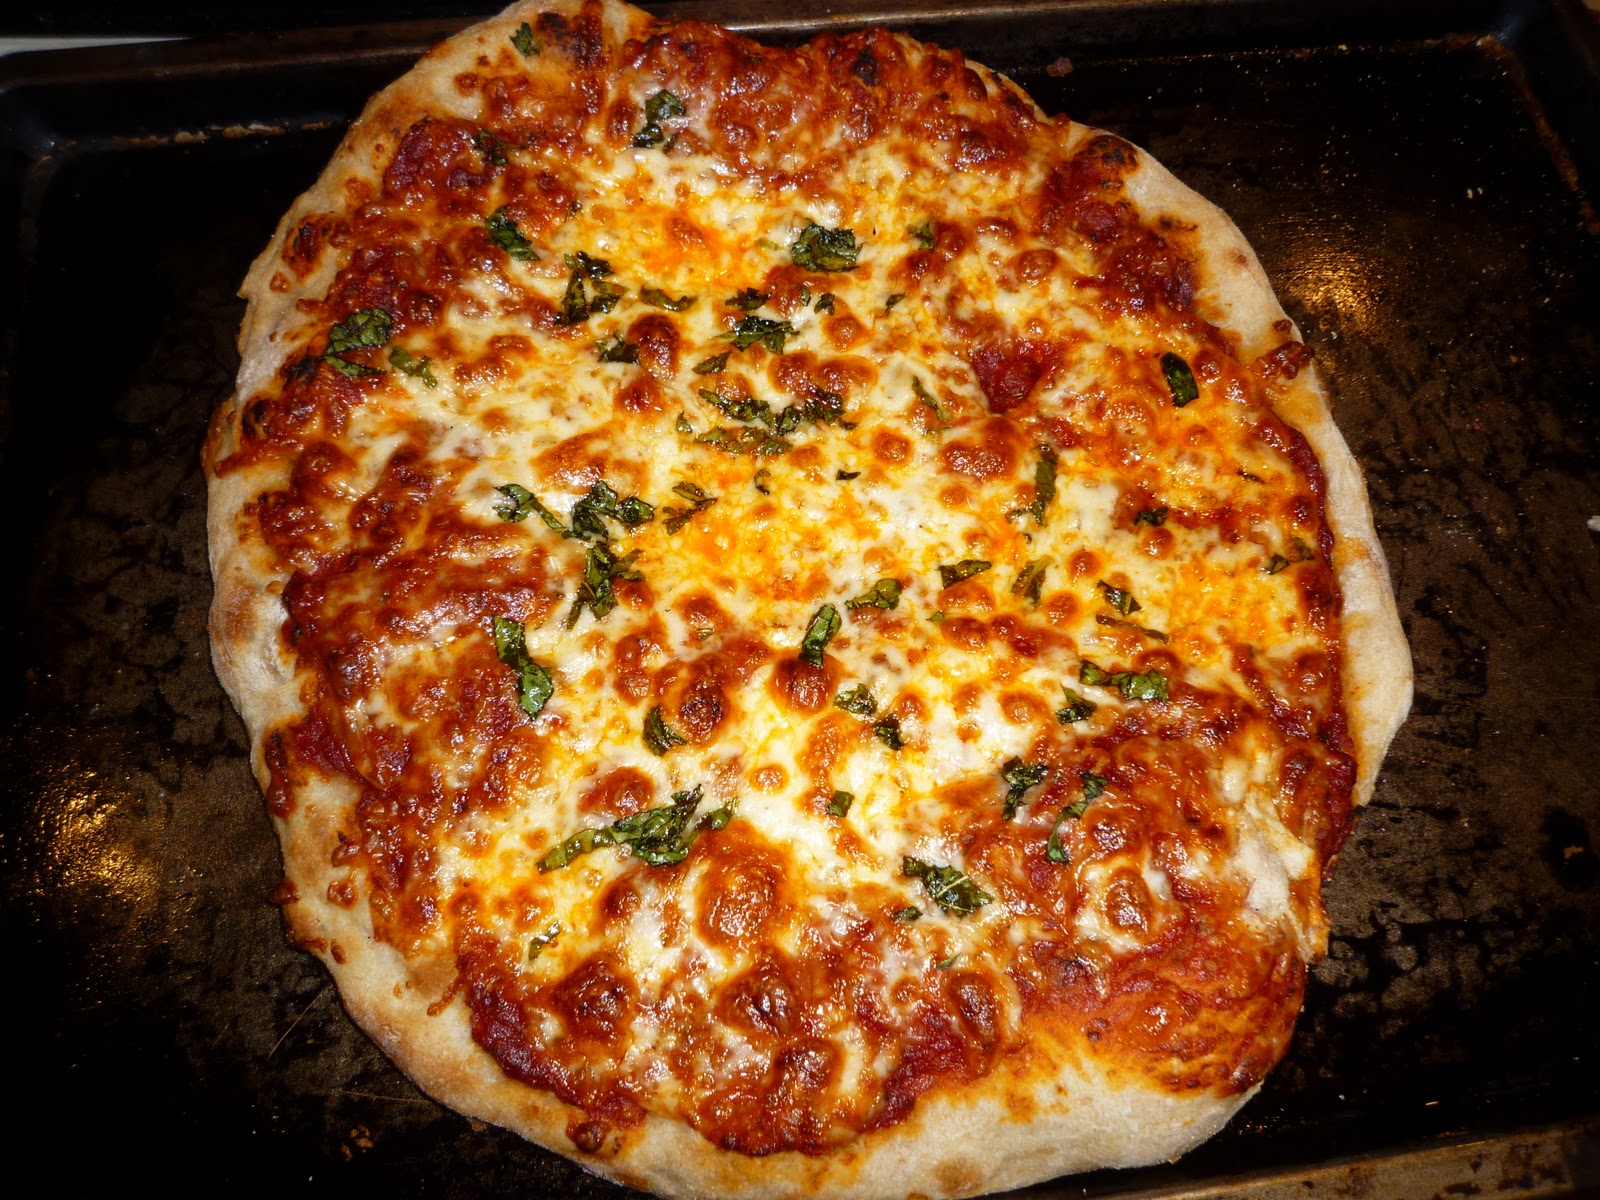
I made this pizza a few days ago. It's based closely on Peter Reinhart's "Sourdough Pizza Dough" recipe in Artisan Breads Every Day (Reinhart 69-71). Fair warning: this takes a long time and I had to plan three days in advance. However, I have never had homemade pizza that tastes like this. Simply incredible. I highly recommend it for anyone wanting to make it. I made a few modifications (changing the starter base) and cutting the bread flour with whole wheat flour, but I am sure that the original version is just as good (or probably better) than mine. Here goes:
Mix the starter together in a bowl. Cover in plastic wrap and let sit for 6-8 hours before using or refrigerating. According to Reinhart, it can last for up to 4 days. I used it the next day.
If you refrigerated the starter (like I did), let it sit out for 2 hours before using it in the dough. Dough:
226g of sourdough starter (all of it)
460g unbleached bread flour
50g whole wheat flour 340g lukewarm water (pour in 300, use the last 40 to hydrate the dry active yeast)
1 teaspoon dry active yeast
14g salt
1.5 tablespoons honey
2 tablespoons olive oil
Mix the flour, water, and starter together in a bowl with a dough whisk. Then add the hydrated dry active yeast, salt, honey, and olive oil. Mix again until well blended. Let the dough rest for 5 minutes.
Knead the dough for about three minutes until it begins to feel more like dough than a sticky lumpy mass. Then use the stretch-and-fold technique in the bowl or on an oiled surface: stretch the dough and fold the end closest to you up to meet the top of the dough. Then stretch the top of the dough and fold it back toward you (in half again). Then stretch and fold the left side in so it divides the dough into thirds and stretch and fold the right side in on top of it. Turn the dough over and let sit for 10 minutes and repeat the process. After this second time, repeat the process two more times. The whole process should take 40 minutes.
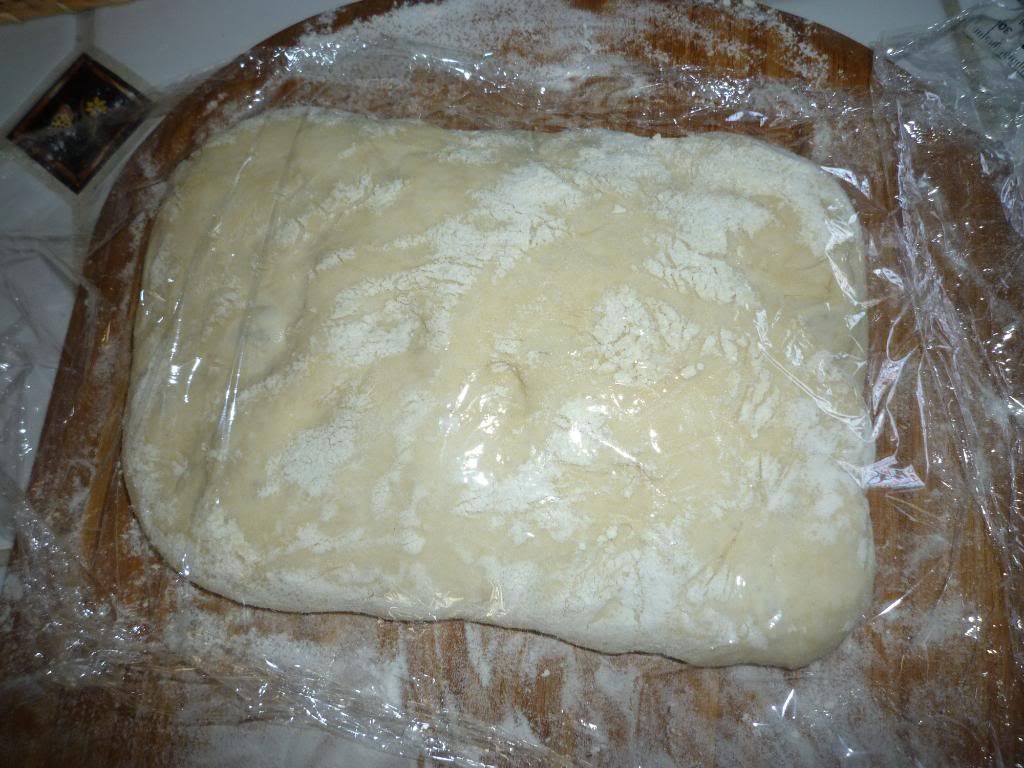
Split the dough into 5-6 equal pieces and place them in sealable plastic baggies. If you want the pizzas to be large, break it into 3-4 and use larger freezer bags. The put the dough in the refrigerator overnight. They can stay there for up to four days. I used half on the next day and half two days later. The pizza dough seemed exactly the same.
The next day, take the dough out of the refrigerator 90 minutes before you plan to bake. Spray oil on a cookie sheet. With lightly oiled hands, remove any dough you want to use from the bags and roll each piece into a separate ball. Place on the cookie sheet and lightly cover with plastic wrap.
Prepare any toppings that you plan to use. 30 minutes before baking, heat the oven and baking stone to 475 degrees F (you may need to go higher if you have a large oven). Make sure you baking stone is on the bottom-most rack of the oven. This will ensure that your bottom crust is crispy rather than soggy. Our oven is fairly small so if the oven is too hot, things will burn, but so long as the oven stone is as far down as possible, it manages to cook the pizza to perfection.
Just before you are ready to bake, lightly flour your hands begin to stretch the dough. I found the dough to be very stretchy. I was even able to toss it a bit, but it only took about 45 seconds to get each piece of dough into a lovely thin crust. Top the pizzas with whatever you want. I topped three of the pizza's with a heavily-modified version of Lisa Rayner's Pizza Sauce (Rayner 101) [1], part-slim mozzarella, and fresh basil. I stretched the last one less thin and coated it lightly with olive oil and sprinkled it with garlic salt and fresh rosemary. It made fantastic mock-foccacia.
On the peel.
With homemade sauce.
With mozzarella and basil
Load the pizza into the oven with the pizza peel. Let cook for four minutes. Turn the pizza so it is facing the opposite direction. Cook for 3-4 more minutes. Then your pizza is ready to eat.
Out of the oven after 8 minutes. Amazing.
Endnotes
I ended up heavily modifying the pizza sauce because it was way too thick and flavorless for my taste (and I hate fennel). I will try Reinhart's sauce next time (Reinhart 70).
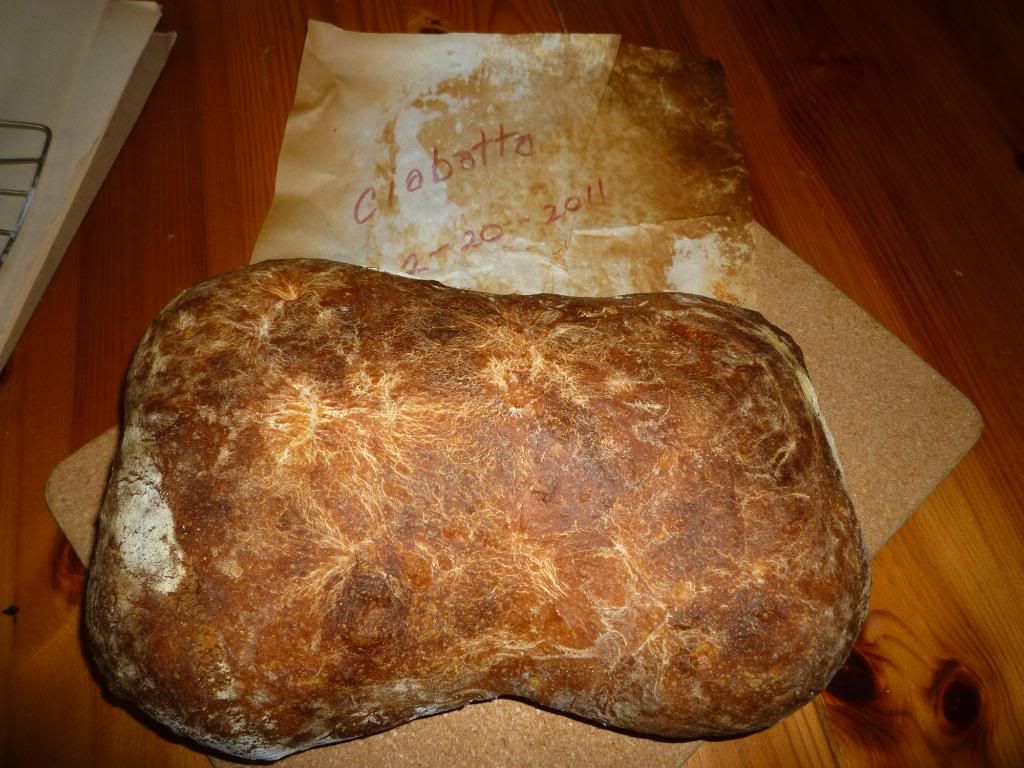
Many moons ago on a very early blogpost, I promised a revised version of this recipe for sourdough ciabatta. The blogger who originally posted it had little success. I had a moderate amount of success it worked 3 out of four times, I think, but I want to modify the recipe and figure it out. I am going to write my version of the recipe with running commentary.
Here is what I did: Poolish
153 grams of whole wheat sourdough starter (100% hydration)
1/2 cup bread flour (I used her volumes, so this is 68 g bread flour)
3 tablespoons water (51 g water)
Kath's starter was 125% hydration. Mine is 100% hydration. This means that instead of the gooey paste that she describes, my poolish is much more like a wet dough. If her volume measurements are accurate, then this dough is 88.2% hydration.
Poolish
Dough
45g Whole wheat flour (1/4C)
273g Bread flour (2C)
Water 196g (3/8C) plus 46.5 grams as a second addition (total of 370 g)
10g Salt (2t)
272g Poolish (all of it)
14g Olive Oil (1 tablespoon)
I wanted to make my entire bread 80% hydration, like the ciabatta recipe I used to such success from Reinhart's Artisan Bread's Every Day, so I changed things around a little. I am also changing up the directions. 80% hydration breads are very sticky and difficult to work with, but ciabatta is traditionally between 75-85% hydration.
Mix together the whole wheat flour, the bread flour, the 196g of water, the 10g salt, and the poolish. Let sit for five minute for the flour to hydrates. Drizzle the olive oil over. Mix by hand with the slap-and-fold technique with a 2 minute break in the middle for ten minutes. Let sit for 5 minutes. This ended up working very well.
Mix the 46.5g water into the dough using the stretch-and-fold technique, a little bit at a time. The dough is folded 4 times over a 40 minute period (as per Reinhart's instructions). This was quite problematic. The water did not want to absorb into the dough structure of the other bread. All of the gluten bonds seemed to break. I had to reknead the dough significantly and ended up taking about an hour rather than 40 minutes to do so. Anyway, I think this is why the crumb did not turn out to be what I had intended.
Let rise for 3.5 hours. My loaf almost doubled in size. It is possible I should have let it proof for longer so that it would fully double in size. I still do not have a handle on the proper uses of my sourdough starter.
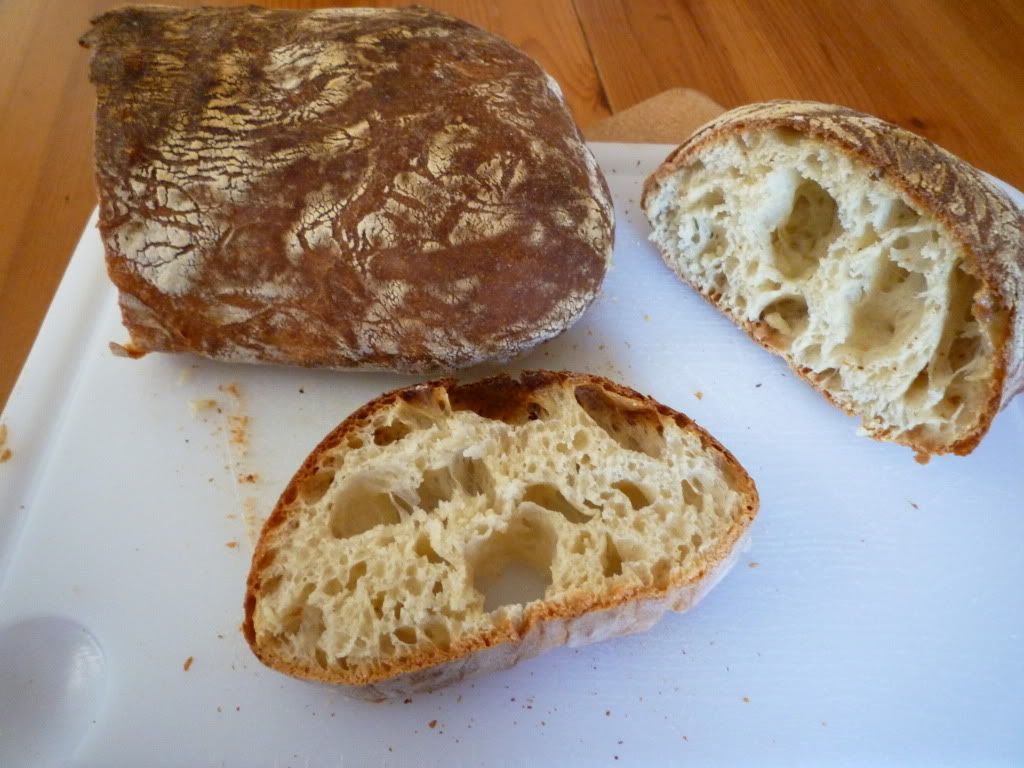
After three and a half hours, shape the dough into a rectangle and cut into two pieces. Gently, without degassing, stretch the dough a little and then fold it, placing it on floured parchment, seam side down. Let proof for another hour under plastic wrap. Turn seam-side up and stretch into loaves. Let proof for another two hours. Bake at 450 degrees F for 12 minutes under steam and then turn the bread around in the oven for 15 minutes to finish. The crumb did not turn out as well as I had intended. It was a fairly dense crumb, although there were some large irregular holes throughout. However, there were small air-bubbles in the dense parts of the crumb and the flavor of the bread was nutty and mild. It's just not perfect. I don't know whether it's my sourdough starter, the recipe, or the kneading technique which is making it dense. Maybe all three? Maybe I need an overnight fermentation process instead of the poolish. If anyone is willing to try out the recipe and provide feedback, I would love to hear it.
Pretty loaves with lovely crust.
Questionable Crumb.
As you can see from this picture, the crumb is not great. Although it is soft and creamy, it's significantly denser than ciabatta should be and the irregular holes are more like tunnels from incorrect shaping than like the beautiful artisan holes of my baker's yeast loaf. However, the bread had a lovely flavor, even if it was the wrong texture. Unfortunately, I do not have enough knowledge to figure out how to fix this problem. Maybe some more experimenting. If anyone has advice, I would love to hear it by comment or email.
When I first started making bread, I read a lot of different bread blogs. One of the things I noticed was that people talked about the percentage of the hydration of the dough, but I had no idea what that meant and I had trouble finding a coherent explanation, even though I am sure they were right under my fingertips. I also thought using grams rather than volume measurements to weight the dough was a ridiculous waste of time. Now I know better.
The clearest explanation I have ever found comes from Lisa Rayner's Wild Bread, which I have discussed in previous posts (Rayner 56-57). First off, baking percentages are based on grams. They are not particularly useful if you are only using volume measurements (although if you're willing to do a lot of math it could help you out).
So flour is always considered to be 100%. Let's say that you are using 500 grams of flour for your recipe, 100% is 500g. Water, or "hydration percentage," is calculated by it's comparision to the flour. For example, 375g means that to get the "hydration percentage" you divides 375g/500g=75% hydration. At this point the bread itself is 175% hydration. For most breads, salt should be between 1.8-2%, therefore between 9-10g of salt.
As a note, this flour and water includes any flour and water in your poolish or your sourdough starter. For example, if you use 100% hydration sourdough starter (which is what I have, meaning that I feed it with equal parts flour and water), then you can divide the weight of your starter in half. For example, if you use 200 grams of sourdough starter at 100% hydration, this means you consider it in baker's percentages as 100g water and 100g flour. So if you were to add 200g starter to your 500g flour and 375g water, then your bread would be (375+100g water)/(500+100g flour)=79.1%. The overall dough was 180% (if we use 1.9% salt). This would be a very wet dough-- maybe a ciabatta or focaccia. Lean European white doughs are around 65% hydration and whole wheat lean doughs are closer to 75% (because whole wheat flour absorbs more water).
Baking percentages are important because they allow you to easily scale the amount of loaves up or down. They also allow you to decide how to modify recipes based on changing recipes from regular yeast to sourdough starter. Rayner says making the starter equal 20-60% of the total recipe's flour and water, and then subtracting that amount of flour and water from the recipe (Rayner 57).
If you are interested in using volume measurements but are willing to do the math to use baker's percentages, I found this tool to convert flour. Also, for water, 1g=1ml and ml can be converted into other volume measurements.
Today, while I try to translate Horace, Medea, and do my math homework, I am making two recipes using weights (in grams) instead of volumes trying to increase my understanding of baker's percentages. Wish me luck!
Today (and yesterday's) baking experiment was a learning experience, to be sure. The Reinhart ciabatta turned out well with a few small problems while the Rayner pizza dough turned out poorly with a minor upside. First, the bad news, then the good news.
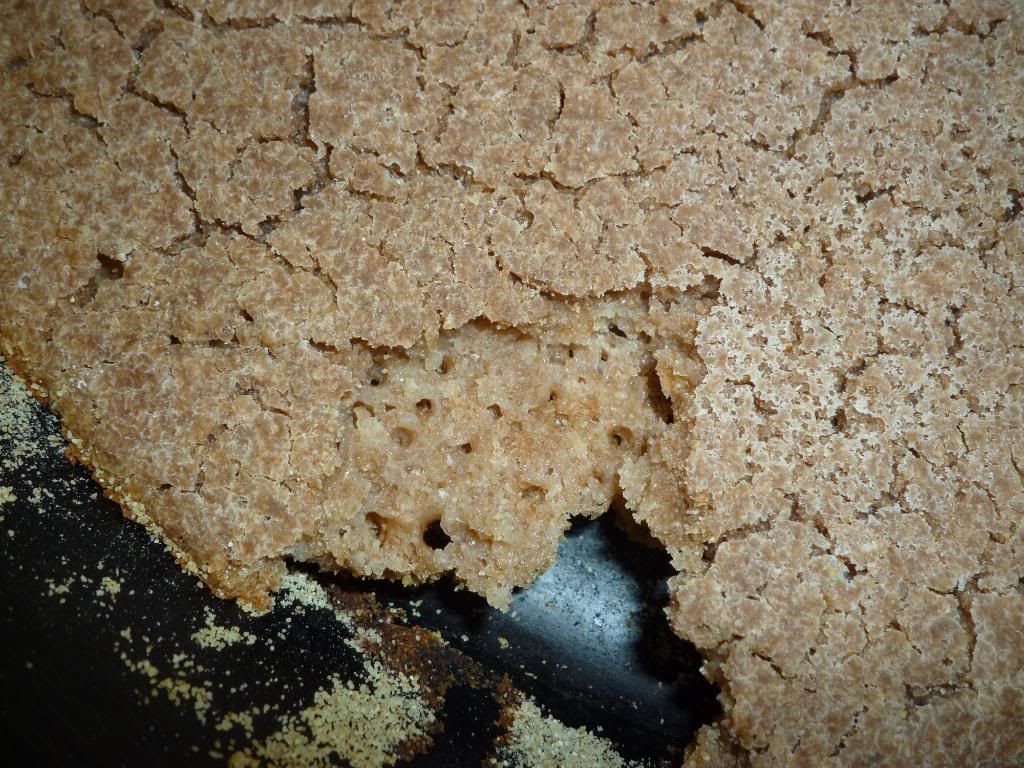
Pizza Goup: Well, no matter what we did, it did not rise. I cooked it anyway. It was flat as a pancake and once it began cracking and looking like the Sahara desert. When I broke it open I was surprised: the bread inside had a light and bubbly crumb (although it was severely underdone because I was afraid to keep it in the oven any longer). I nibbled at the edge, which was cooked. It was actually good! Since I let it sit overnight, it was very sour, but I liked it. I think I might up the salt from 1.8% to 2% if I make it again and I will actually try to make it rise.
Pizza Goup: Out of the oven.
Pizza Goup: the crumb.
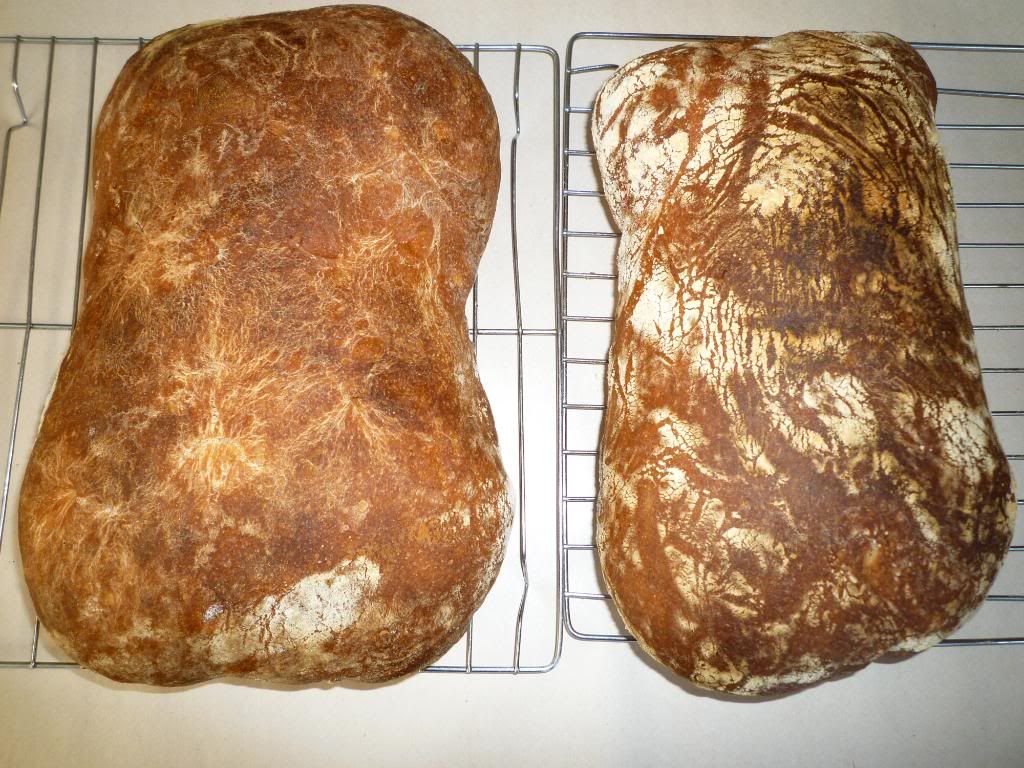
Ciabatta: The ciabatta from Artisan Breads Every Day, despite my hesitation, came out beautifully. I did an experiment: I did one of on parchment paper as Reinhart suggests and placed one of the loaves on the pizza peel in my traditional style. I have decided there is no reason to use the parchment paper except maybe for the first proof. I also realized that every oven is different. At least for my oven, the turning the oven to 525 degrees F (our highest setting) before turning it down to the 450 degrees F baking temperature is a terrible idea (Reinhart 54). The bread had beautiful oven spring, but after the first 12 minutes it almost immediately began to burn. After another few minutes I turned it down to 350 degrees F and
after another minute or too tented the bread with aluminum foil to prevent it from burning further. My suggestion is that if you have an oven like mine (and are using an oven stone) just heat the stone up to 450 degrees F. That being said, the bread still turned out extremely well.
The larger loaf, rising for the 3rd time.
The slightly smaller loaf rising on the pizza peel.
The two loves, out of the oven.
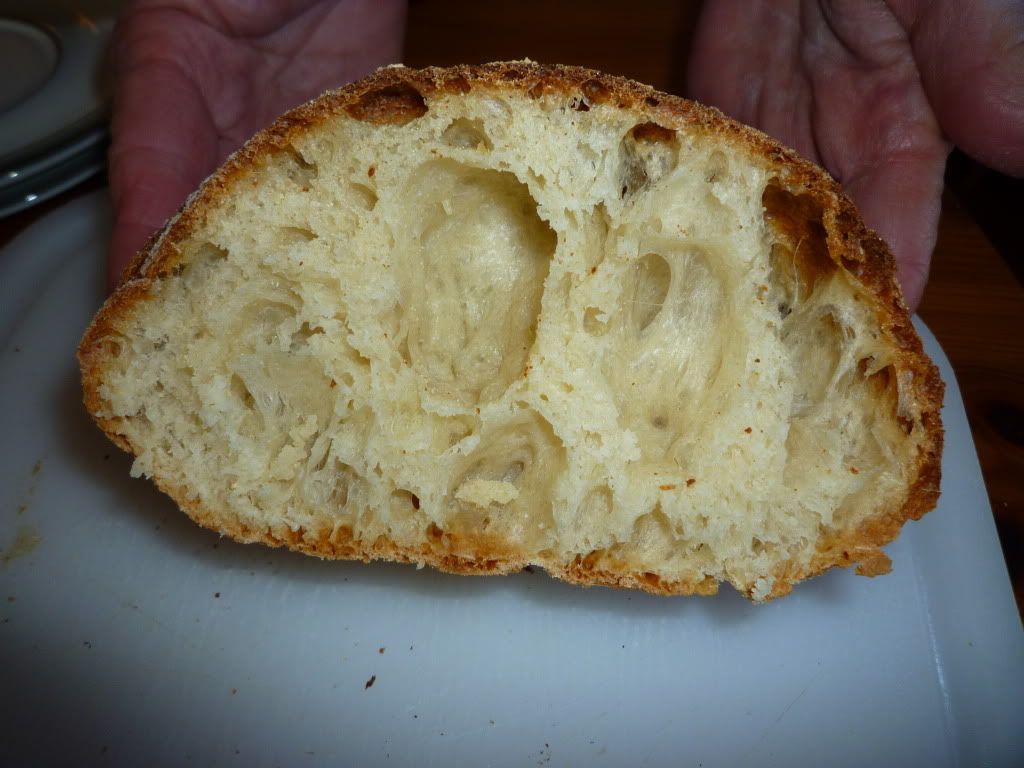
A nice, open, irregular crumb.
Crust and crumb!
The Aftermath.
It was lovely. I ended up eating more of it than I intended so it was lucky that I did not have much lunch. If you can get a hold of the book, this is a recipe I would highly recommend, especially with brie, a creamy soup, or as the bread for a sandwich.
I have the updates from yesterday's baking log: not promising, but not without hope either.
Ciabatta: The ciabatta has tripled in size. I am not kidding. I unfortunately don't have a picture of the original for comparison (clearly I don't have real foodblogging chops) but I have the doubled and the tripled photos:
Doubled in size.
and compare...
Tripled in size.
Now under normal circumstances this would be a cause for celebration. Bread rose, right? It must be good. There are two reasons why I am hesitant. First, this is a baker's yeast recipe. Obvious things with baker's yeast should rise, but over-proofed goods with baker's yeast taste terrible. I obviously can't tell if it is overproofed, but I know that our refrigerator temperature might not be quite as cold or might fluctuate (the refrigerator is a good work-horse, but very old), which may mean that the yeast was not slowed down as much as necessary for Reinhart's cold fermentation process requires. Second, I made one of Reinhart's breads from his book Whole Grain Breads: New Techniques, Extraordinary Flavor [1] and it had the same Frankenstein properties, and turned out over-proofed, yeasty, and with dense crumb despite it's original swelling. On the other hand, I did not know nearly as much about bread as I do now, so maybe I will get lucky and this bread will turn out fine.
I just split the dough and turned it into two ciabatta rolls. It's possible that I over-degassed the dough because I had to maneuver the dough a lot and I had to cut it with a knife which was more difficult than I anticipated (I really need a pastry scraper). I'm hoping they turn out ok. Wish me luck!
Ciabatta rolls.
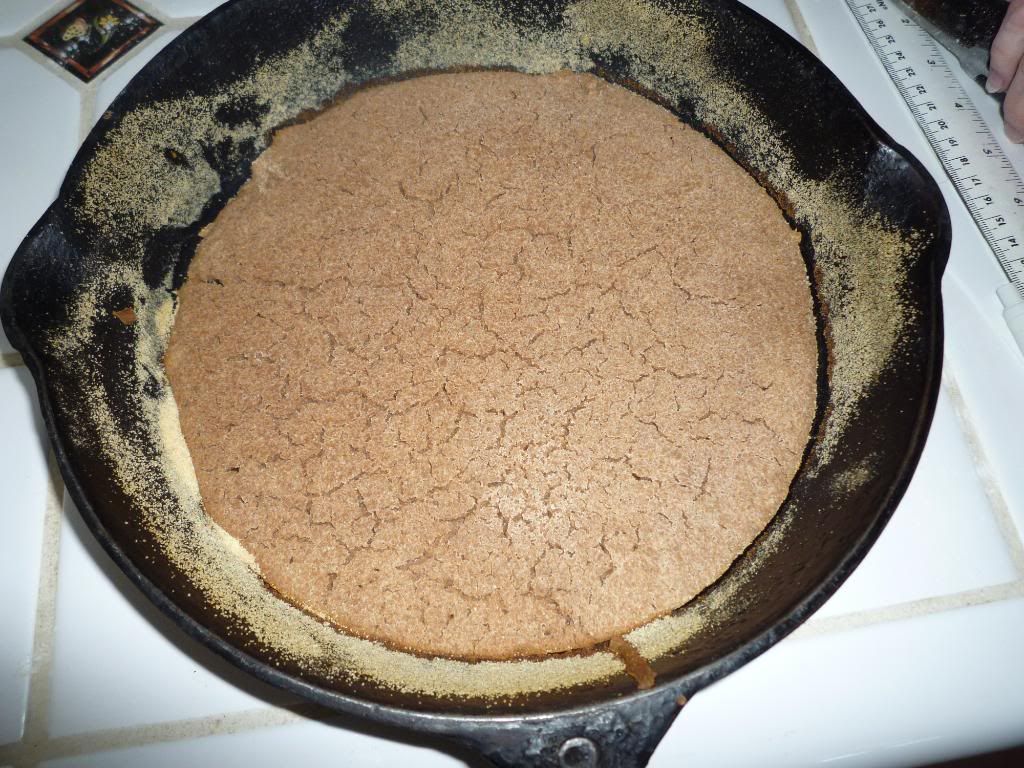
No Knead Pizza Dough: So this is probably a dough I should have given up on a long time ago. I guess I just have too much baker's optimism because so many of my slightly-botched creations turned out beautifully at my Alma Mater [2]. On the other hand, although the dough had not changed in size, it was bubbly on the top and a little on the sides (a sign of fairly healthy sourdough starter). So, I followed Rayner's instructions and took a cast-iron skillet (one that has been in the family for at least 3 generations!) coated it with olive oil and semolina flour and poured in the bubbly, goupy mass. Letting it rise for another two hours and them I'm going to bake it. We shall see!
Pizza Goup: Phase 2.
One of the things that is really helpful about Wild Bread is that it delves more deeply than my other bread books into the biology of yeast rather than the organic chemistry of bread which is the primary focus of most books [3]. Rayner says that "you must get to know the individual characteristics of your culture" (Rayner 33) which is why she leaves out instructions on proofing time other than the amount that the dough should have risen. I have never been a particularly good biologist or naturalist (I'm much more of a theory than a practice person). Servia and I are trying determine the activation time of our culture by noticing how long it takes between a feeding and the culture becoming a spongy mass with a layer of bubbles on top (peak of yeast leavening activity) and from there try to follow Rayner's instructions [4]. Maybe then we will have more luck with our pizza dough.
Endnotes
If you like cooking science, Whole Grain Breads: New Techniques, Extraordinary Flavor is a fabulous book. I learned all that I know about wheats, starches, crusts, and enzymes from this book and I highly recommend it as, at the very least, good reading to make yourself more knowledgeable.
I recently found out that the city of my Alma Mater is one of the best places for sourdough. It may have been the weather and the "yeasty beasties" (as Cerinthus calls them) in the region that helped more than my own personal luck or skill.
Obviously an understanding of the chemistry of bread is essential and as I mentioned before, Peter Reinhart's Whole Grain Breads: New Techniques, Extraordinary Flavor is fabulous in this regard. Understanding Baking is another wonderful text that even has a chart telling you the possible problems to diagnose your problematic loaves. Wild Bread has a similar appendix, but it is only focuses on sourdoughs (Rayner 152-155).
For the biology of sourdough and how to take care of it, see "Caring for a Sourdough Starter" (Rayner 32-40).
So in the spirit of trying to learn from my mistakes but not be definitionally insane (trying the same thing over and over and expecting a different result), I decided to make two very different new bread recipes today.
For dinner tonight: I am planning (with Servia) to make whole-wheat no-knead pizza crust from Wild Bread (Rayner 102-103). It looked easy and allowed me to try again with my sourdough culture because the bread is almost entirely made out of sourdough culture. Thus far I have mixed the ingredients together, covered the bowl to proof, and it has been proofing for over an hour with almost no change whatsoever in the "batter dough." One of the problems with Rayner's book is that few of the recipes include the amount of time to proof. Being fairly inexperienced especially in this climate, I have absolutely no idea how long it is supposed to proof, only that it should "double in bulk." This may make dinner difficult. However, she has a recipe for pizza sauce (Rayner 101) that looks great (so long as I remove the fennel seeds-- I really hate fennel).
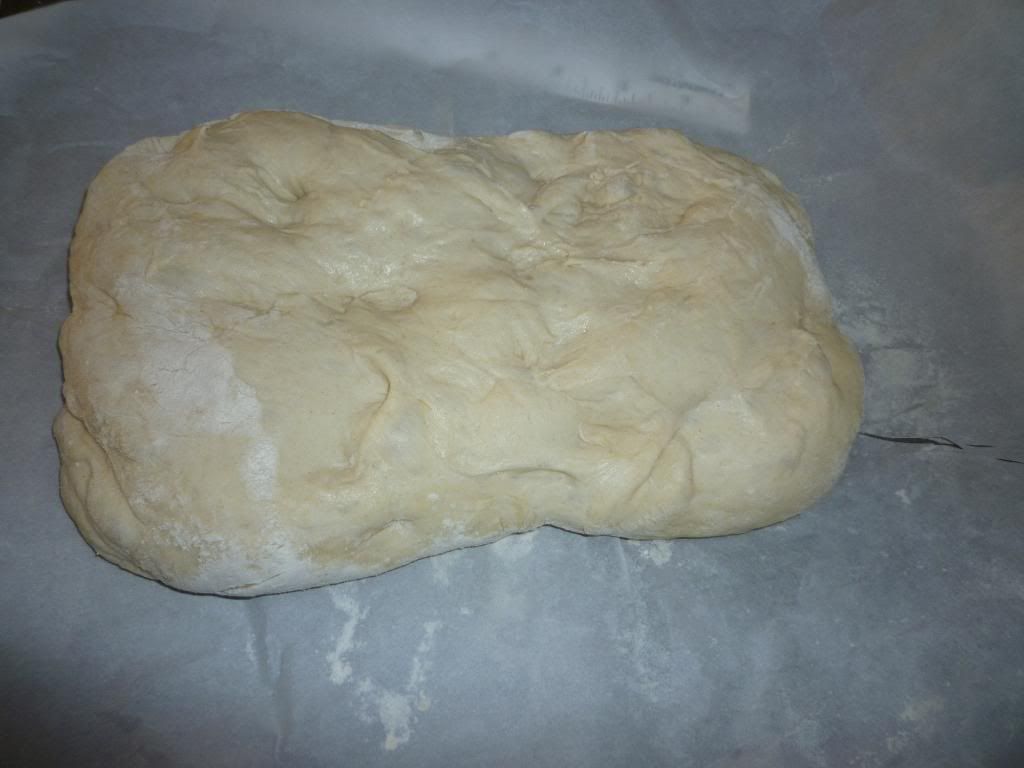
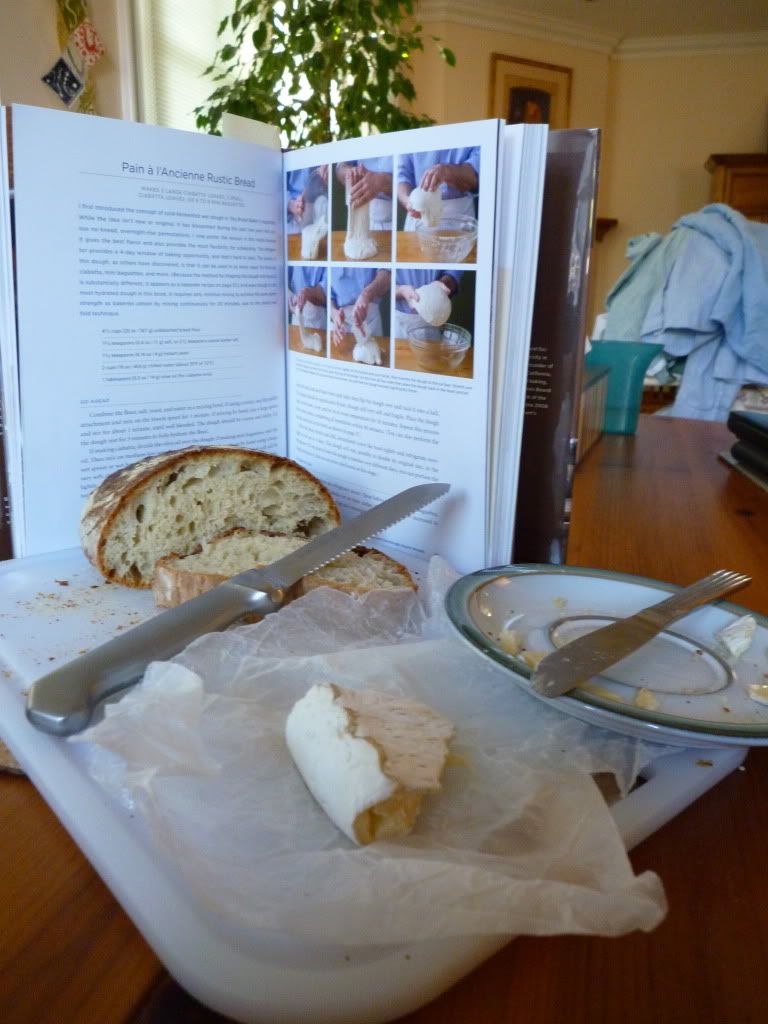
My other experiment is on the opposite side of the spectrum in every way: it uses baker's yeast, white flour, and provides exact instructions. When I first started baking bread, one of the supposed fail-proof breads was Peter Reinhart's Pain à l'Ancienne Rustic Bread (Reinhart 52-54). I received the book (Artisan Breads Every Day) for my birthday, but I had not gotten around to it yet. It looks fairly easy. It involves a cold-fermentation method where the dough rises in the refrigerator overnight. I tried his stretch-and-fold technique rather than my usual slap-and-fold technique. Reinhart's stretch-and-fold involves a puring the dough onto a lightly oiled surface and stretching it and folding it: first the front-end, then the back end, and then from each side. After this, tuck the dough into a ball and let it sit for approximately ten minutes boefore repeating the process. This happens four times (all together) within 40 minutes (Reinhart 52-53). Interestingly, I just found a similar technique demonstrated on Bread Cetera. As this bread rises overnight, I have no idea what the bread will look like until tomorrow. The dough I made seems to be within the general range of the dough shown by Reinhart, but I did notice that it seemed slightly firmer than Reinhart's pictures, which makes me slightly apprehensive. I will post an update tomorrow.
Update: After over 7 hours, the pizza dough has hardly risen at all. It's bubbly like a sourdough culture should be but it just does not seem to have changed significantly. Anyway, we're thinking of leaving it overnight just to see if it will do anything and trying to bake it tomorrow. I am just fundamentally at a loss as to what the problem is with the starter. My only guess it that it's too liquidy: Rayner recommends a "sponge" starter which used 1:1 ratio of flour to water (that's by weight. She says 2:1 by volume). I guess I will have some more understanding tomorrow.
Can this really be pizza dough?
On the other hand, the ciabatta has risen wonderfully and as long as the air incorporation and gluten development were sufficient with the stretch-and-fold technique, it should come out quite well.